Wednesday, February 8, 2023

Short: breakout box for the Agilent 6627A quad power supply

Since my 6627A quad power supply is working again, I finally decided to make something long overdue. A breakout box to be able to simply connect to supply to whatever I'm doing on my bench. This is not a complicated design, I had all the components lying around.

The basic function is very simple. The 6627A does not have front connectors, it is designed to be a system power supply sitting in a rack with other equipment. The box connects the rear panel terminal strip to binding posts in an organized manner, so that the supply can be left on the shelf, without the need to access its rear.

I had a buch of HP-like binding posts and also an unused good quality plastic box. I arranged the binding posts on the box in 2 rows of 2 four wire connectors. I used the four wire to be able to compensate for the voltage drop on the connecting cable by also having the sense terminals on the box.


For the wiring, I used two four wire cable for the 4 channels' voltage outputs and one cable with 4 twisted pair lines for the sense lines. The sense lines can be much less in cross section, as they do not carry high current, but they are recommended to be twisted pair for noise suppression.


The whole project took a couple of hours. I drilled the box for the binding posts and connected the wires with spade terminals at the end. Unfortunately the box is a bit small, more space between the channels would have been nice for access, but not a big deal.

The posts for each channel are the standard 19mm apart, so two or four prong connectors could be used.

Basically that is it. I can now put the box on the bench and have the power supply available there. Obviously, the voltage and the sense terminals have to be connected. They will likely be shorted at the box most of the time, but if required this connection can be made elsewhere.

I still need to put labels on the box to identify the channels. It is really bad if you accidentally mix up power supply channels.


Tuesday, February 7, 2023

Repairing an Agilent 6627A quad power supply - Part 2: wrapping up

In Part 1 I started working on the Agilent 6627A quad power supply with one bad channel. Replacing Q319 did not fix it, however there were changes. The -7 Volt rail was now low. Curiously this rail is called -5.75V on the schematics for the 1 and 3 power output boards, even though they are identical to the 2 and 4 boards, where it is correctly shown as -7. The circuits are the same only the PCBs are sort of mirrored so two of these boards can fit next to each other with the power modules facing the fan. I assume this is a mistake in the schematics, or maybe the remains of an older version. Anyway, I had to find out what pulled the voltage down (well, up, towards 0V).


Q319 was replaced so I traced which signal goes where. The circuit with Q319 has only one output-like signal, the BLEED_SINK line for the downprogrammer circuit. The only obvious fault which could pull the -7V down is a shorted CR355, which is a 1N4850 diode. A quick check proved that it was indeed shorted. The 1N4850 is a bit hard to find, but it should not be too different from the very common 1N4148, other than a lower voltage and a higher current. Actually the higher current requirement was inconclusive, as some datasheets gave the same current for both. Since the 1N4148 is higher voltage it should not matter at least for a trial. So I replaced CR355 with a 1N4148.

This still did not fix the power supply, but there was yet again some change. The output would now not stay at zero, but tried to output some voltage, then drop to 0 and start again. The supply was still alternating in CV, CC and UNREG modes. The -7V rail was still very low and pulsating as the output would try to regulate.

So it was time to look at what else could have caused this. Disconnecting R314 fusible resistor would unload the -7V supply, which could be now verified that it worked without load. I then scrutinized the schematics for all appearances of this power line, looking for possible sources of fault. CR352 and CR353 diodes were OK. The next suspect was the C370 tantalum. Tantalums are always suspect! It was a bit hard to get to it, as it is mostly covered by the heat-sink, but removing the board made access possible. Indeed this capacitor measured 5 ohms in both polarities, which is not good. I did not have replacement, so simply removed it, which should again be fine for testing. Once this capacitor was out, the power board came to life and provided rock solid output. C370 is not a filter cap across the power rail, so until the other problems were fixed it did not affected the -7V. Once the broken trace to Q319 was reconnected, this cap came into play. At the beginning of the troubleshooting the -7V power was in spec.

I ordered a new 1N4150 and a 39uF tantalum, they should be here in the coming days. But I consider the repair successful. I will still need to verify and if required calibrate the supply, but that should be simple.

There were 4 fault is the unit. A shorted transistor, a broken trace, a shorted diode and a shorted tantalum. The first 3 are in the same part of the circuit and their demise could be related, but I don't really see how the trace broke, as the -7V is current limited probably below damage levels. Maybe some external impact? The capacitor most likely became shorted by itself.

The moral of the story is that there could be several fault creating similar symptoms, never assume that replacing one faulty component should fix the problem. Actually fixing something might uncover other hitherto unknown problems. This means one needs to restart the troubleshooting and not think that if a power rail was good at the beginning it would stay so during the repair. 

Study the schematics and figure out which bad components could result in the observed fault. Go methodically and test them.


Sunday, January 22, 2023

Repair of an HP 5334B counter - Part 2 - finish

Back from a long break when I did not have much time to tinker with electronics stuff. But back with full steam, I picked the 5334B from the backlog to finish first.

I traced the signal path for channel A, and very quickly found that the Q8 jFET was dead. It is a 2N4416, which I was able to source easily. It was cheap, so I made sure that I buy more than one, which later proved to be a wise decision. After replacing it, channel A immediately sprung to life. So channel A is working.

But not finished yet. While channel B seemed to work on initial inspection, it had much reduced sensitivity and bad offset with the trigger level. This was more challenging to troubleshoot. The way the trigger level setting works is that there is a comparator (U22), which always compares at 0V. The input signal is given an offset, which will counterbalance the signal, so that the desired trigger point falls on the 0V level. Normally the trigger level is between -5V and 5V and thus the offset is from 5V to -5V. In reality the offset has other value, because of the gain on the input stage. The problem was that this offset only moved in the negative region, it would not go above around 0.7V.

I had to trace some signals. The trigger level from the front panel pots goes trough a number of analog switches in the DAC section. Fortunately, that was ok. I saw that the full range swing is present when it reaches the amplifier section. There however, something doesn't work. After some pondering and measuring voltages I was able to exclude most of the possibly bad components, with the exception of Q9, the same jFET that was bad in channel A. It was the last component that could have produced the fault and while I couldn't definitely say that it was bad, I had a spare and it was easier to replace than to do more measurements. This promptly fixed the fault!


So in both channels the jFET was bad! The one in channel A was completely dead and the one in channel B was sort of half bad, still enabling some level of functioning. The replacements are the ones with the number 138 on them on the above picture. Note the Teflon standoffs, they are used to provide more isolation to the gate.

Looking at R113, which was burned, I couldn't really figure out what happened. Since that resistor cannot really be overloaded by DC from the input, I suspect either some botched repair, like accidentally shorting something or maybe some brutal high frequency input overload. But I'm not able to tell why these components failed. 

Nevertheless, I performed the adjustment steps in the service manual, since the input stage had been  repaired. All steps completed correctly, so I'm happy to have yet another nice universal counter after a quite challenging repair. One can never have enough frequency counters!


Sunday, October 3, 2021

Repair of an HP 5334B counter - Part 1 - first looks

Some time ago, I got an HP 5334B counter off eBay. It was advertised az not powering up and it had a best offer option. I like not powering up stuff, as usually they have some simple problems. It was missing the display cover, but since the unit had the OCXO option and based on the pictures I was able to confirm that the HP 10811 oven oscillator was there, I submitted an offer of about the third of what the OCXO is worth by itself. Somewhat to my surprise the offer was accepted and the counter was on its way to me.


Initial inspection has shown that there were no major parts missing and it indeed had the oven oscillator.


After making sure on the line voltage setting, I also confirmed that it did not power up, not even the standby led, which should indicate that the oven is powered up. So I checked the trivial stuff first. The fuse seemed to be good, but I always measure if it does not look obviously blown.


Hmmmm. That OL on the meter is sure makes me suspicious that the fuse is not as good as it looks. I got a replacement and look, it powers up. That sure is easy. Or maybe not, still need to test it.


In case you are wondering in the meantime I was able to get a front panel for a couple of bucks, complete with the display cover. The cover was installed, it simply pops into place and I now have a bunch of replacement switches for vintage HP equipment. It also had the plastic trim on the upper side of the front, so test equipment OCD was avoided this time, by not missing anything from the unit.

However, not all is nice. The trigger led for channel A is always lit and channel A does not work at all. B and C do. Fortunately for someone who repairs test equipment for fun, it was not simply a blown fuse.

So let's get the service manual and follow the signal path for the input. In this case, the gameplan is to simply follow along and see where the signal disappears. The input may have been blown by overvoltage or anything like that could have happened, so a systematic fault finding is the best way to go.

Connecting A and B with the Com key will make Channel B count the A input, but that does not help a lot, since the Common switch as very near to the front of Channel A, only the AC/DC coupling switch (relay) and the 50 ohm input terminating resistor is there. But, at least we know that those are good.

On the other hand I discovered that R113 is fried. So there was very likely some overload situation.


The only problem is that R113 is in Channel B, so this is not the cause of a faulty Channel A.

In the next part I'll go trough the testing of Channel A components. 

Thursday, May 20, 2021

Repairing an Agilent 6627A quad power supply - Part 1

For some time I have an Agilent 6627A quad power supply, which had one bad channel (the reason I could get it for a good price). While so far I didn't really need it, it always bugged me to have faulty equipment.

The symptom is that the output is always at 0 Volts. The channel is in unregulated state, but otherwise there is no error, it passes self test. The self test mostly covers the digital part only, so this is not a surprise.

I have verified that the readback works by forcing voltage and current on the output. This supply can also sink current, so no harm in doing this.

The power supply has 3 main components. A huge (I mean huge!) transformer, as this is a linear supply. A control board + front panel and the channel boards. In this case it has 4 identical (nearly, as for packaging reasons they are 2 + 2 more or less symmetric boards. In other configuration there are less channels and there are double sized boards with double power. But the 6627A has 4 40W 0-50V output boards. This can greatly simplify debugging as there is a working reference.
The whole setup is in a quite clever fold out design, where the upper output boards fold out on a hinged aluminium plate.

The channel boards are quite complex, with their own microcontroller, DACs, ADCs, etc, so debugging is far from straightforward.

In this unit channel 1 is bad, which is the lower left board. After some visual inspection for anything suspicious I decided to swap this with channel 2, which is one of the upper boards. This would give better access and I wouldn't have to poke around the line input at the back. So I did that, quite easy, just had to remove 4 screws and a some connectors. Probably this will require re-calibration, but I would do that anyway later. 

For initial troubleshooting I went with the guide in the service manual, it has an extensive troubleshooting section. All voltages were ok, the DACs are ok, and the usual suspects were quickly eliminated. 

I finally reached Q319, a simple 2N2222A transistor which had a short. Replaced, but nothing happened. I realized that its emitter should be at -7V, but it was not.

There was no connection between the -7V regulator and Q319, so I began to trace the connection and saw that the the trace is burned up at one point, so clearly there was some catastrophic event.  Maybe it was caused by the shorted transistor or maybe the short happened as a result of something else. Anyway, it needs to be fixed to continue.

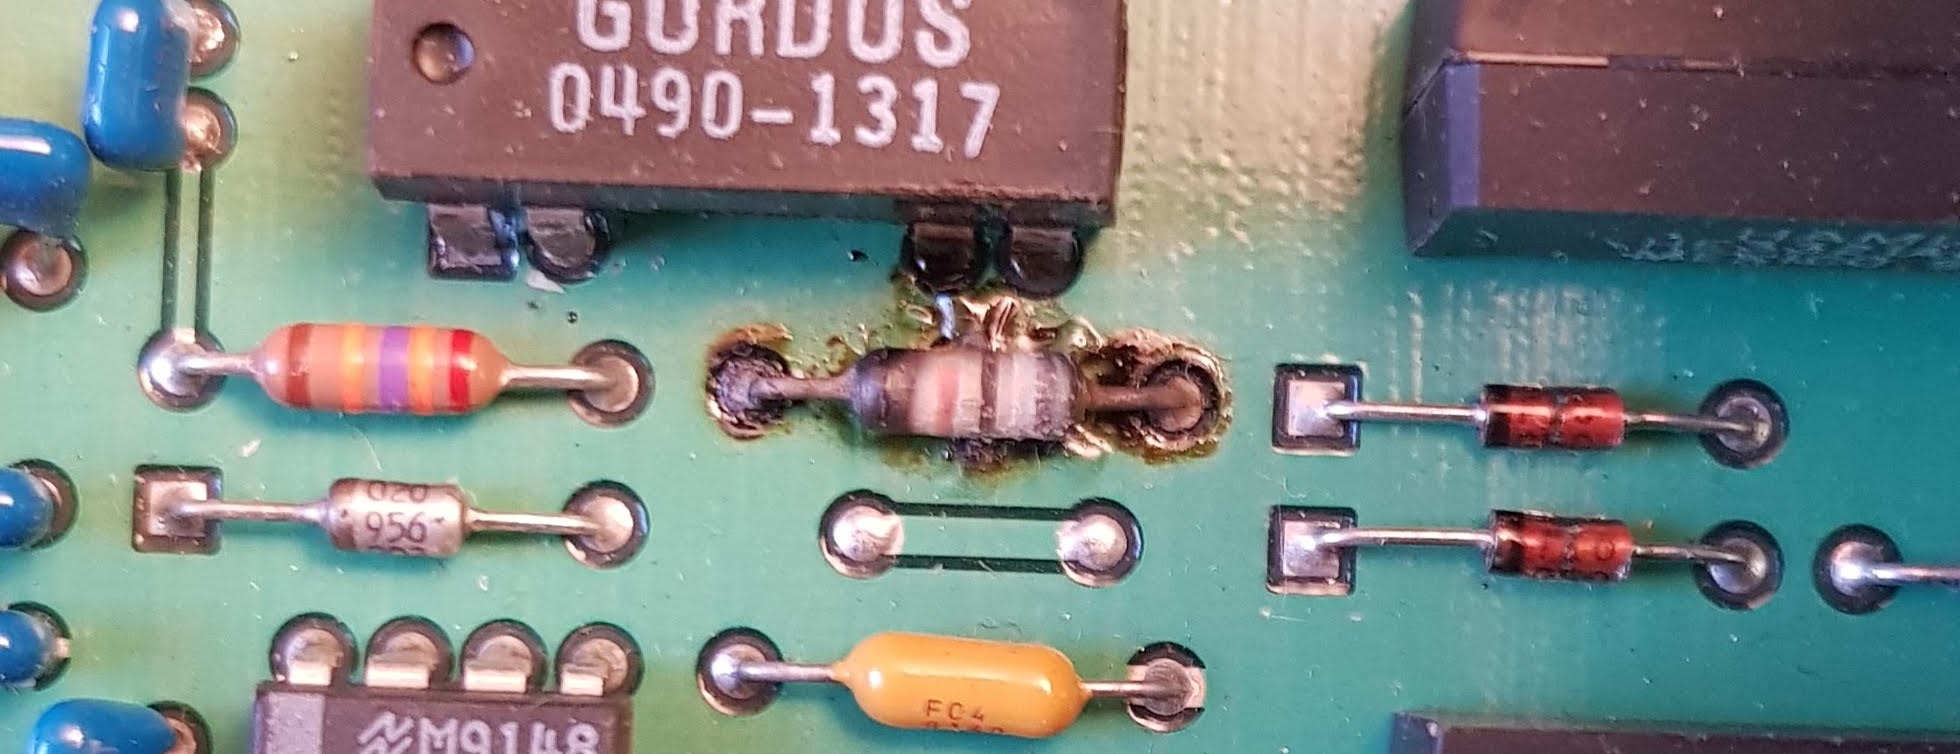
The trace broke where it passes between the two pins. The solution is to bridge this. Since it is at a very inconvenient place, I decided to use a jumper wire on the solder side instead.  

Fortunately there were two nearby vias, where i could attach the wire, so it was quickly fixed.

That fixed, the result is that the channel is now jumping between CV, CC and unreg modes and the -7V rail is down to about about -4V.
So obviously there are still things remaining to be fixed.

My approach is now to study the schematics in more detail to more deeply understand how it is working and trying to come up with what faults can cause these symptoms.

Stay tuned for the next part, while I continue finding the problem and writing Part 2 of this post.


Tuesday, April 20, 2021

Fixing an HP 3314A function generator - repair complete!

Wrapping up from Part 2. 

I managed to source a CA3082 locally, so there is no need for any workaround. I popped it in, and it worked.


I had a problem with one of the reed relays, but this time it was not on the driver side, but on the actual reed contact. It wouldn't work however I exercised it by quick switching. By luck, I had a handful of reed contacts with the same size, so I snipped the old one out, it was spot welded and soldered in the new one. Carefully, they are fragile. I say this from experience.

 Fortunately both leads could be soldered well, it would have been hard to weld them again. 

I went trough the adjustment section of the manual, got everything in spec. Now I have proudly resurrected a vintage 3314A from a quite bad repair attempt by a previous owner. 

It is a nice and still quite capable instrument.


Tuesday, April 13, 2021

Fixing an HP 3314A function generator - Part 2.

Continuing with the repair of the HP 3314A function generator that was "repaired" by a previous owner. I left off at the decision of checking everything that was done to it.

First I had to clean up. 5 of the 6 EPROM adapter boards were soldered into the instrument and for some unknown reason 1 was in a socket. I started beeping out the connection between the EPROMs for the data and address lines, and sure enough, found several where there were no connection. Not very surprising, given what I have seen with the 74S74 IC in the clock generator circuit. Also, some of the adapter boards were bad, there was no connection between some of the pins, there were cold solder joins there.

Very carefully I started removing the adapters. Even though HP made quite sturdy PCBs, I didn't want to risk any more damage, so I snipped the pins of the adapters and removed them one by one. I also removed the two 74ls373, they are the ones with the two jumpers next to them. You can see the solder blobs at their ends near to the EPROMs. That is where their pins were snipped and soldered from above, presumably to fit after the adapter boards were already put in.

Once everything was removed, I was already able to see four broken traces under U209, the one in the socket. Those were fixed with scraping off the solder mask and soldering twin wires there.

Then I checked for continuity for every pad related to the ROMs and installed high quality sockets and replaced the 2 74ls373. All this took quite some time, but was well worth the effort as at the end I had a nice board.

I again double checked continuity to the sockets and proceeded with getting the EPROMs fixed.

Next, I turned my attention to the adapter boards. My initial idea was to scrap the 6 EPROMs and just use one with a 74ls148 priority encoder figuring out the additional address lines from the 6 chip select signals. But to make it nice it needed some PCB, and work, and then I also realized I actually had 3 of the same (well, nearly same, they were blue, and a bit different layout) adapter boards from an earlier project, so I actually only had to clean up three of the old ones. So I went with tidying up those boards, as the previous owner even got those wrong, instead of using the proper jumper places he used bodge wires to configure it. After some tedious work with the solder sucker and the iron, I got all six EPROMs ready for action.

Plugged them in and did again a quick check that everything is in place and turned the instrument on. It started the countdown and then did the calibration sequence without problem. Honestly I wasn't expecting that, I was prepared to see a bunch of calibration errors at best.

Halleluja! But does it play Halleluja? No! There is no output. There is output from the sync, but nothing from the signal. 

Ok, don't panic, just think. If the calibration sequence is successful, then there must be a signal with proper amplitude and frequency where the calibration signal is picked off. Looking at the schematics, this is done nearly at the very end, after the output amplifier, but before the output attenuator.  I quickly verified this with a scope. Looks like the signal is lost somewhere at the reed relays. So the main suspect now is the relays themselves or the drivers of the relay coils.

The relays are controlled by a latch which in turn controls a CA3082 transistor array. The latch seems to be good, but the voltages on some of the outputs of the array were strange. As a quick test I piggybacked some random NPN transistor on one of these outputs, and surprise surprise, the corresponding relay came to life. 

So the CA3082 seems to be a fault. This is an obsolete part, not too easy to get. Of course I made a purchase on eBay for some cheap solution, I'm pretty much certain that it will be fake, but let's take some chances. As plan B I also designed a small PCB with surface mount transistors as a pin compatible replacement. 
So right now I'm waiting for either a working replacement or the PCB. This will take a couple of weeks probably. Hopefully this will fix the instrument. I'll write a Part 3. of this post once this happens.